***Please note, the ISN integration is not compatible with the new app experience. The instructions below only apply to the legacy version of the app.
The ISN integration only takes 4 steps to setup. Make sure you understand and complete each step so the integration operates like you are expecting.
- Add the ISN Integration to your Tap Inspect account
- Get your keys from ISN and enter into Tap Inspect
- Link your Tap Inspect templates to each ISN Order Type
- Choose how to deliver reports and complete ISN orders
Add the ISN Integration
Point your web browser to https://app.tapinspect.com/integrations (login with your email and password if needed) and click on Add Inspection Support Network.

Enter ISN Keys into Tap Inspect
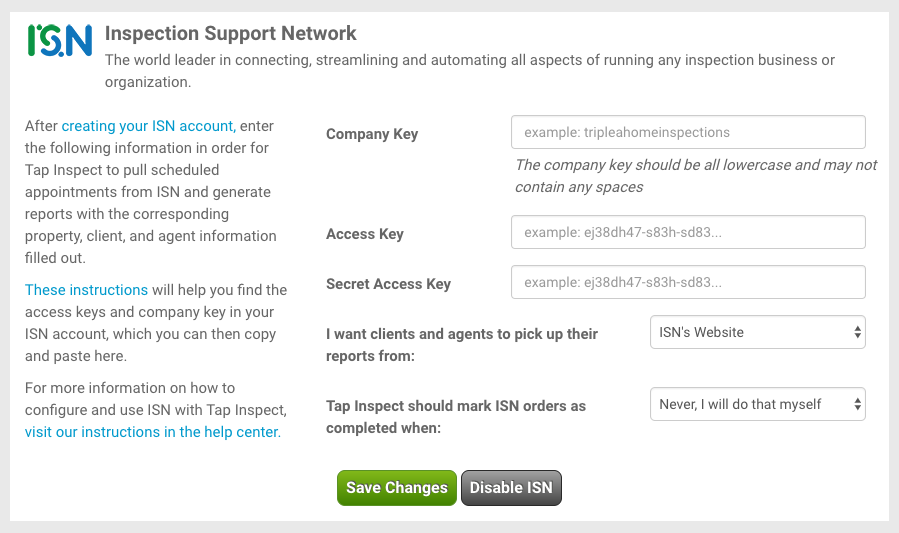
Once you add the integration, you will be asked to enter your ISN account credentials. Each of the fields must be entered before the integration will become active.
If you have have multiple ISN users the keys displayed will be for the currently logged in ISN user. Make sure you get the inspector's keys when setting up the inspector's integration. Not someone else's like your office manager.

The screenshot below shows where you can find the access keys and company key for your ISN account. You can find more detailed information on how to find this in your account in this ISN help center article.

Copy and paste your ISN credentials into the Tap Inspect integration settings page and choose Save Changes. Tap Inspect will next attempt to connect to ISN and discover what order types you have defined in your account.
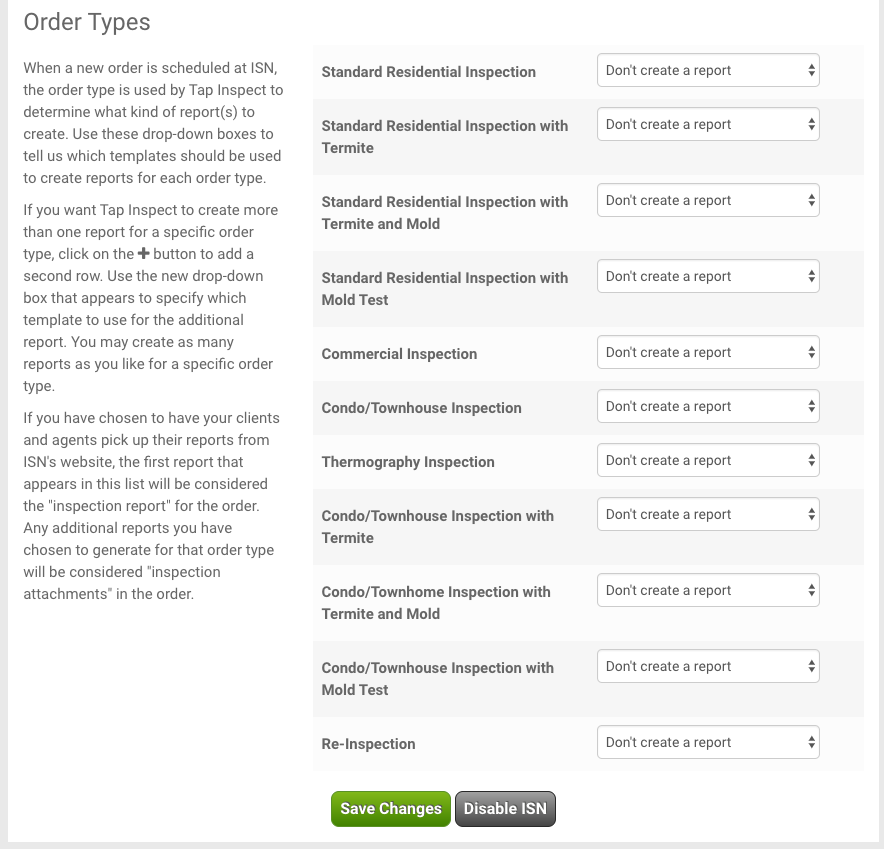
Link Tap Inspect templates to ISN Order Types
When a new order is scheduled at ISN, the order type is used by Tap Inspect to determine what kind of report(s) to create. Use the drop-down boxes to tell us which template(s) should be used to create reports for each order type.

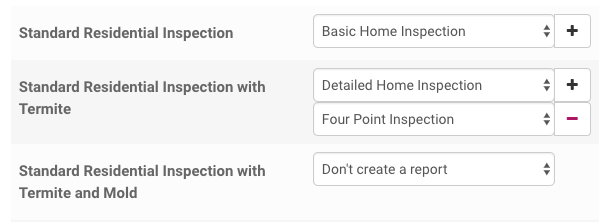
Multiple Reports for an Order Type
If you want Tap Inspect to create more than one report for a specific order type, click on the + button to add a second row. Use the new drop-down box that appears to specify which template to use for the additional report. You may create as many reports as you like for a specific order type, but the template you have chosen first will be considered the "inspection report" for the order. Any additional reports generated will be considered "inspection attachments" for the ISN order. Use the - button to remove templates from an order type.
If you want Tap Inspect to ignore certain order types, you can simply choose Don't create a report.

Choose Report Delivery Method
You should also decide how you want your clients and agents to pick up their published reports. You have two options to choose from:
- Have clients and agents continue to pick up their reports from Tap Inspect's website. When you publish a report, they will receive an email from the Tap Inspect system as normal.
- Have clients that agents pick their reports up from ISN. When you select this option, published report PDFs will be uploaded to their corresponding ISN order. When that order is completed, ISN will handle delivery of reports for you. Clients and agents will never visit the Tap Inspect system.
Make your selection by choosing the value you want with the following drop-down boxes:

Once you have made all of your selections, choose Save Changes to enable the integration. Within the next few minutes Tap Inspect will import the information for your ISN orders scheduled in the future.
If you have already manually created Tap Inspect reports for inspections that are scheduled through ISN, our system will do its best to match your existing reports to the ISN orders. If this fails, you may see duplicates appear in your inspection list.
Comments
0 comments
Please sign in to leave a comment.